Product development is hard
Building an innovative hardware product is challenging, especially for startups. Only a small percentage of startups succeed. In many cases, failure is not caused by a lack of innovation, but by running out of cash before the product reaches the market.
After the first investment rounds, projects often face delays, rising costs, and increasing pressure to secure additional funding. When progress slows down, investors become harder to convince.
Common reasons hardware development projects fail
These are some of the issues encountered in past projects. Try to avoid:
- Scope creep or unnecessary changes
- Ignoring negative test results or customer feedback
- Too many features or excessive specifications
- Building a product for everybody, which becomes a product for nobody
- Compliance and certification delays
- Insufficient funding left to pre-finance components needed for the first production batch
The Project Landscape framework
Successful product development requires a structured approach, fast learning cycles, and informed decision-making. That is why I developed the Project Landscape, a framework designed to balance creativity, risk, time-to-market, and investment.
The framework helps teams validate assumptions early, reduce development risk, and maintain investor confidence throughout the project.
The project landscape
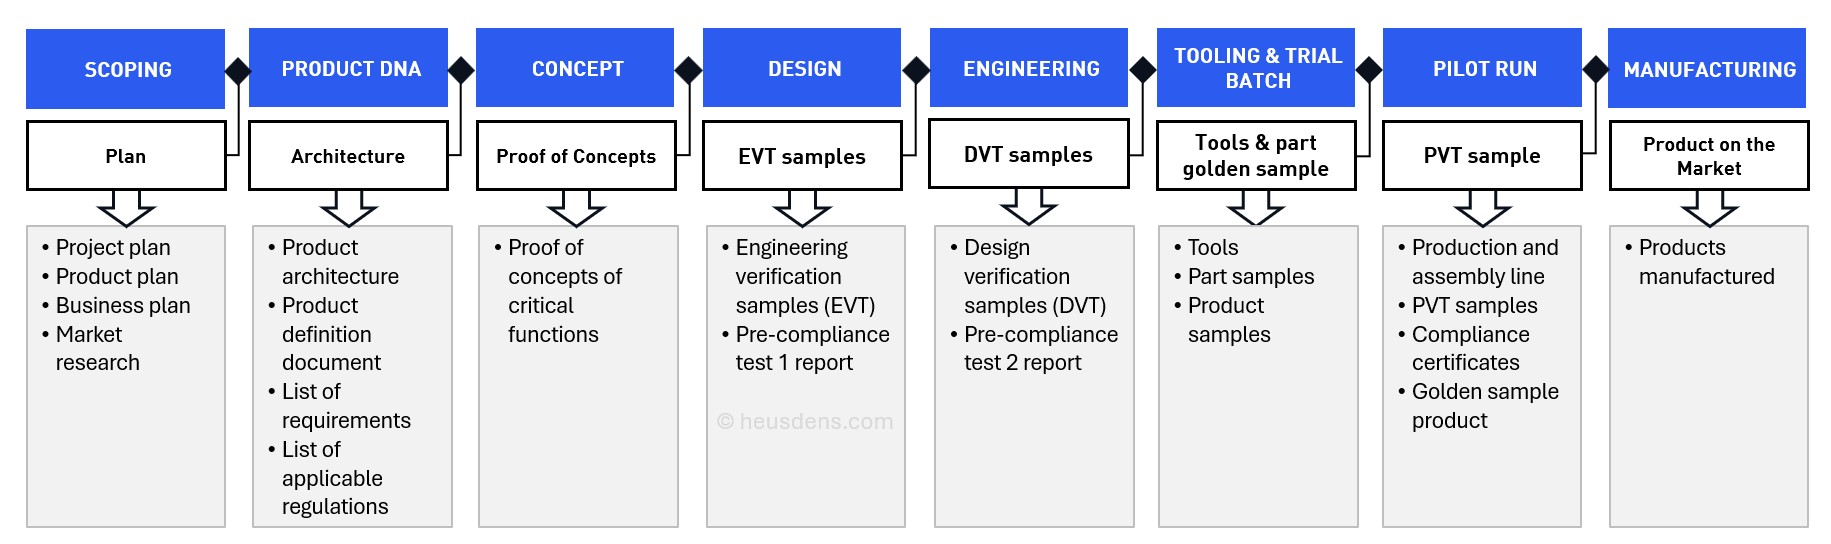
The Project Landscape is a Product Development Life Cycle (PDLC); it breaks the development down into phases. Each phase generates tangible results that help guide project decisions and demonstrate progress to stakeholders.
The core principles for development projects are summarized in a set of basic rules the Project Landscape is built upon.
- Rule 1
Break it down
Break down a large project into smaller, manageable phases. Break each phase into 1 or more PDPVV development cycles.
- Rule 2
Build prototypes regularly
Build prototypes in each cycle and test them. Test the function and test the market/user acceptance. See Verification & Validation.
- Rule 3
Maximum 3 months per cycle
Never longer than three months without a meaningful deliverable. Keep the team focused and investors engaged.
- Rule 4
Pass the gate with care
Establish a steering committee, and pass the gates between phases with care. If there are blocking issues, fix them FIRST. Ignoring an error and then fixing it in the next phase costs 10x more.
Deliverables of phases
Each phase is closed with tangible deliverables. To proceed to the next phase, the development team has to pass the gate.

I recommend installing a steering committee, to whom the development team presents results and risk assessments. The steering committee will ask the questions you didn't think about. In my team we often say: you don't know what you don't know.
- Scoping phase
Product and project plan
In the scoping phase, the "scope" of the development project is defined: the market, key functions, and technology.
- DNA phase
Product Architecture
This phase defines the DNA of the product with product architecture, requirements, and a test plan. The initial risk assessment will point out critical but unproven technologies or components. These will be developed or sourced in the next phase.
- Concept phase
POC
Development and testing of critical functions. These are functions so important to the success of the project that they must be developed or acquired first. Each critical function is proven with a Proof of Concept (POC).
- Design
EVT
Industrial, mechanical, and electronic design of product experience, ergonomics, mechanical function, and PCBA schematics. Tested and proven with a series of EVT prototypes. EVT is the acronym for Engineering Validation Test.
- Engineering phase
DVT
Detailing all parts: plastic and metal parts in 3D, and PCBA Gerbers. Tested and proven with a series of DVT prototypes. DVT is the acronym for Design Validation Test.
- Tooling phase
Tools & JIGs
Tools for plastic injection molding and metal casting. Deliverables of this phase are tools and samples called T1, T2, and golden sample. In this phase we also build JIGs for firmware flashing and QC of the PCBA.
- Pilot run phase
PVT
Pilot run batch to test the production line, assembly, and QC procedures (SOP and SIP). These products are called PVT samples and are used for the final compliance test and CE/FCC certification. PVT is the acronym for Process Validation Test.
- Manufacturing phase
Products, ready to sell
This is why we do all the effort. Finished products leave the factory, packed and ready to ship to the client.
- Remark
EVT / DVT
You might have noticed that the deliverable of the Design phase is EVT, while the Engineering phase is the DVT. Wondering if that's a mistake? No — this is industry standard, and using the same language makes collaboration with suppliers easier.
Steps in the P-D-P-V&V cycle
One project phase is one or more Plan → Develop → Prototype → Verify & Validate cycles. To successfully develop a new project, you will go through a series of these cycles.
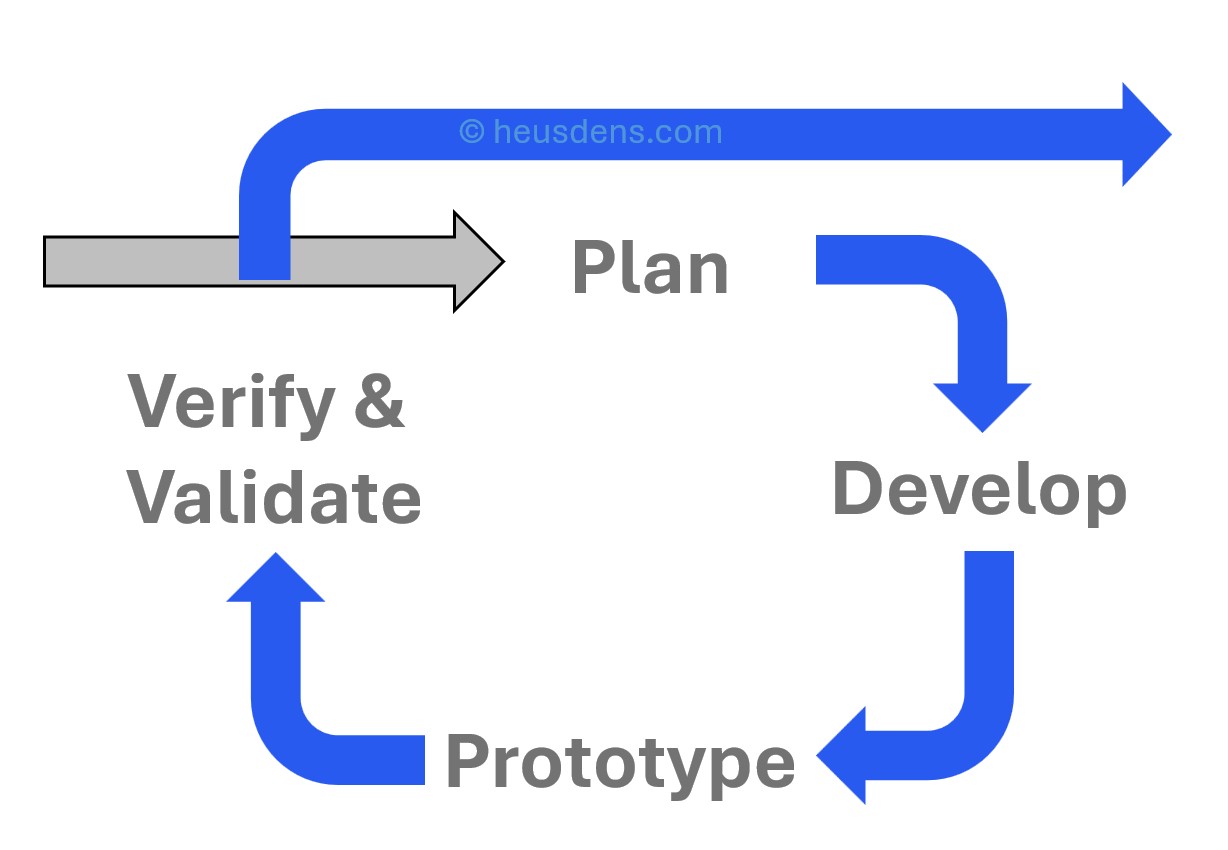
- Plan
Define Scope of Work (SOW) of this cycle
Plan the cycle, the requirements, test plan, and schedule.
- Design
The creative step
Industrial design, mechanical design, and electronic design (PCBA).
- Prototype
Build the prototypes
We use 3D printing (SLA, SLS, FDM), CNC milling for testing mechanical properties, and FEM simulations.
- Verification & Validation
Testing
Testing the prototypes and documenting the results.
Are we building the product right, or the right product?
A key principle of successful product development is understanding the difference between verification and validation. Both are essential — a product can be technically perfect yet fail commercially if customers do not want it.
- Verification
"Are we building the product right?"
Verification confirms that the product meets the defined technical requirements and specifications.
- Validation
"Are we building the right product?"
Validation confirms that the product solves a real customer problem and meets market needs.
Evaluate every prototype from multiple perspectives
- Functionality
- User experience
- Market acceptance
- Compliance requirements
- Manufacturing feasibility
- Cost targets
Early testing creates opportunities to learn, improve, and reduce risk while changes are still affordable.
Adapt the plan as you learn
A development plan should not be fixed. New insights from testing, customers, and the market must be used to adapt the project.
The goal is not simply to develop a product. The goal is to develop the right product, launch it successfully, manufacture the first production batch, and achieve sustainable market adoption.